Description
Julia is a high-level programming language designed for high-performance numerical analysis and computational science. Distinctive aspects of Julia’s design include a type system with parametric polymorphism and types in a fully dynamic programming language and multiple dispatch as its core programming paradigm. It allows concurrent, parallel and distributed computing, and direct calling of C and Fortran libraries without glue code. A just-in-time compiler is used. Ref: Wikipedia
Software Category: lang
For detailed information, visit the julia website.
Available Versions
To find the available versions and learn how to load them, run:
module spider julia
The output of the command shows the available julia module versions.
For detailed information about a particular julia module, including how to load the module, run the module spider command with the module’s full version label. For example:
module spider julia/1.11.6
| Module | Version |
Module Load Command |
|---|
| julia | 1.11.6 |
module load julia/1.11.6
|
Installing Julia Packages
By default, your packages will be installed into ~/.julia. If you wish to use a different location, run:
export JULIA_DEPOT_PATH=/path/to/depot
Here is a useful reference for loading Julia packages.
The following code snippet shows the steps used on my UVA HPC account to install and verify the SharedArrays package.
$ module load julia
$ julia

julia> using Pkg

(press ] to enter package manager mode)

(@v1.11) pkg> status
Status `/sfs/gpfs/tardis/home/rs7wz/.julia/environments/v1.11/Project.toml`

(press backspace to exit)

julia>

(press ? to enter help mode)

help?> sdata
search: stat ispath

Couldn't find sdata
Perhaps you meant stat, ispath, splat, lstat, sort, sort!, cat, hcat, atan, edit, vcat, sqrt, stack, Meta or abspath
  No documentation found.

  Binding sdata does not exist.

(@v1.11) pkg> add SharedArrays
  Installing known registries into `~/.julia`
       Added `General` registry to ~/.julia/registries
    Updating registry at `~/.julia/registries/General.toml`
   Resolving package versions...
    Updating `/sfs/gpfs/tardis/home/rs7wz/.julia/environments/v1.11/Project.toml`
  [1a1011a3] + SharedArrays v1.11.0
    Updating `/sfs/gpfs/tardis/home/rs7wz/.julia/environments/v1.11/Manifest.toml`
  [8ba89e20] + Distributed v1.11.0
  [a63ad114] + Mmap v1.11.0
  [9a3f8284] + Random v1.11.0
  [ea8e919c] + SHA v0.7.0
  [9e88b42a] + Serialization v1.11.0
  [1a1011a3] + SharedArrays v1.11.0
  [6462fe0b] + Sockets v1.11.0

(@v1.11) pkg> status
Status `/sfs/gpfs/tardis/home/rs7wz/.julia/environments/v1.11/Project.toml`
  [1a1011a3] SharedArrays v1.11.0

julia> using SharedArrays

help?> sdata
search: sdata stat ispath

  sdata(S::SharedArray)

  Return the actual Array object backing S.
Interactive Session through Open OnDemand JupyterLab
One-time Setup
Open a Julia terminal and install IJulia:
(press ] to enter package manager mode)

(@v1.11) pkg> add IJulia
  Installing known registries into `~/.julia`
       Added `General` registry to ~/.julia/registries
    Updating registry at `~/.julia/registries/General.toml`
...
Precompiling project...
  13 dependencies successfully precompiled in 34 seconds. 28 already precompiled.
Starting an Interactive Session
See here for instructions.
When JupyterLab opens in your web browser, it will appear with a selection of notebook kernels to choose from, as shown below.
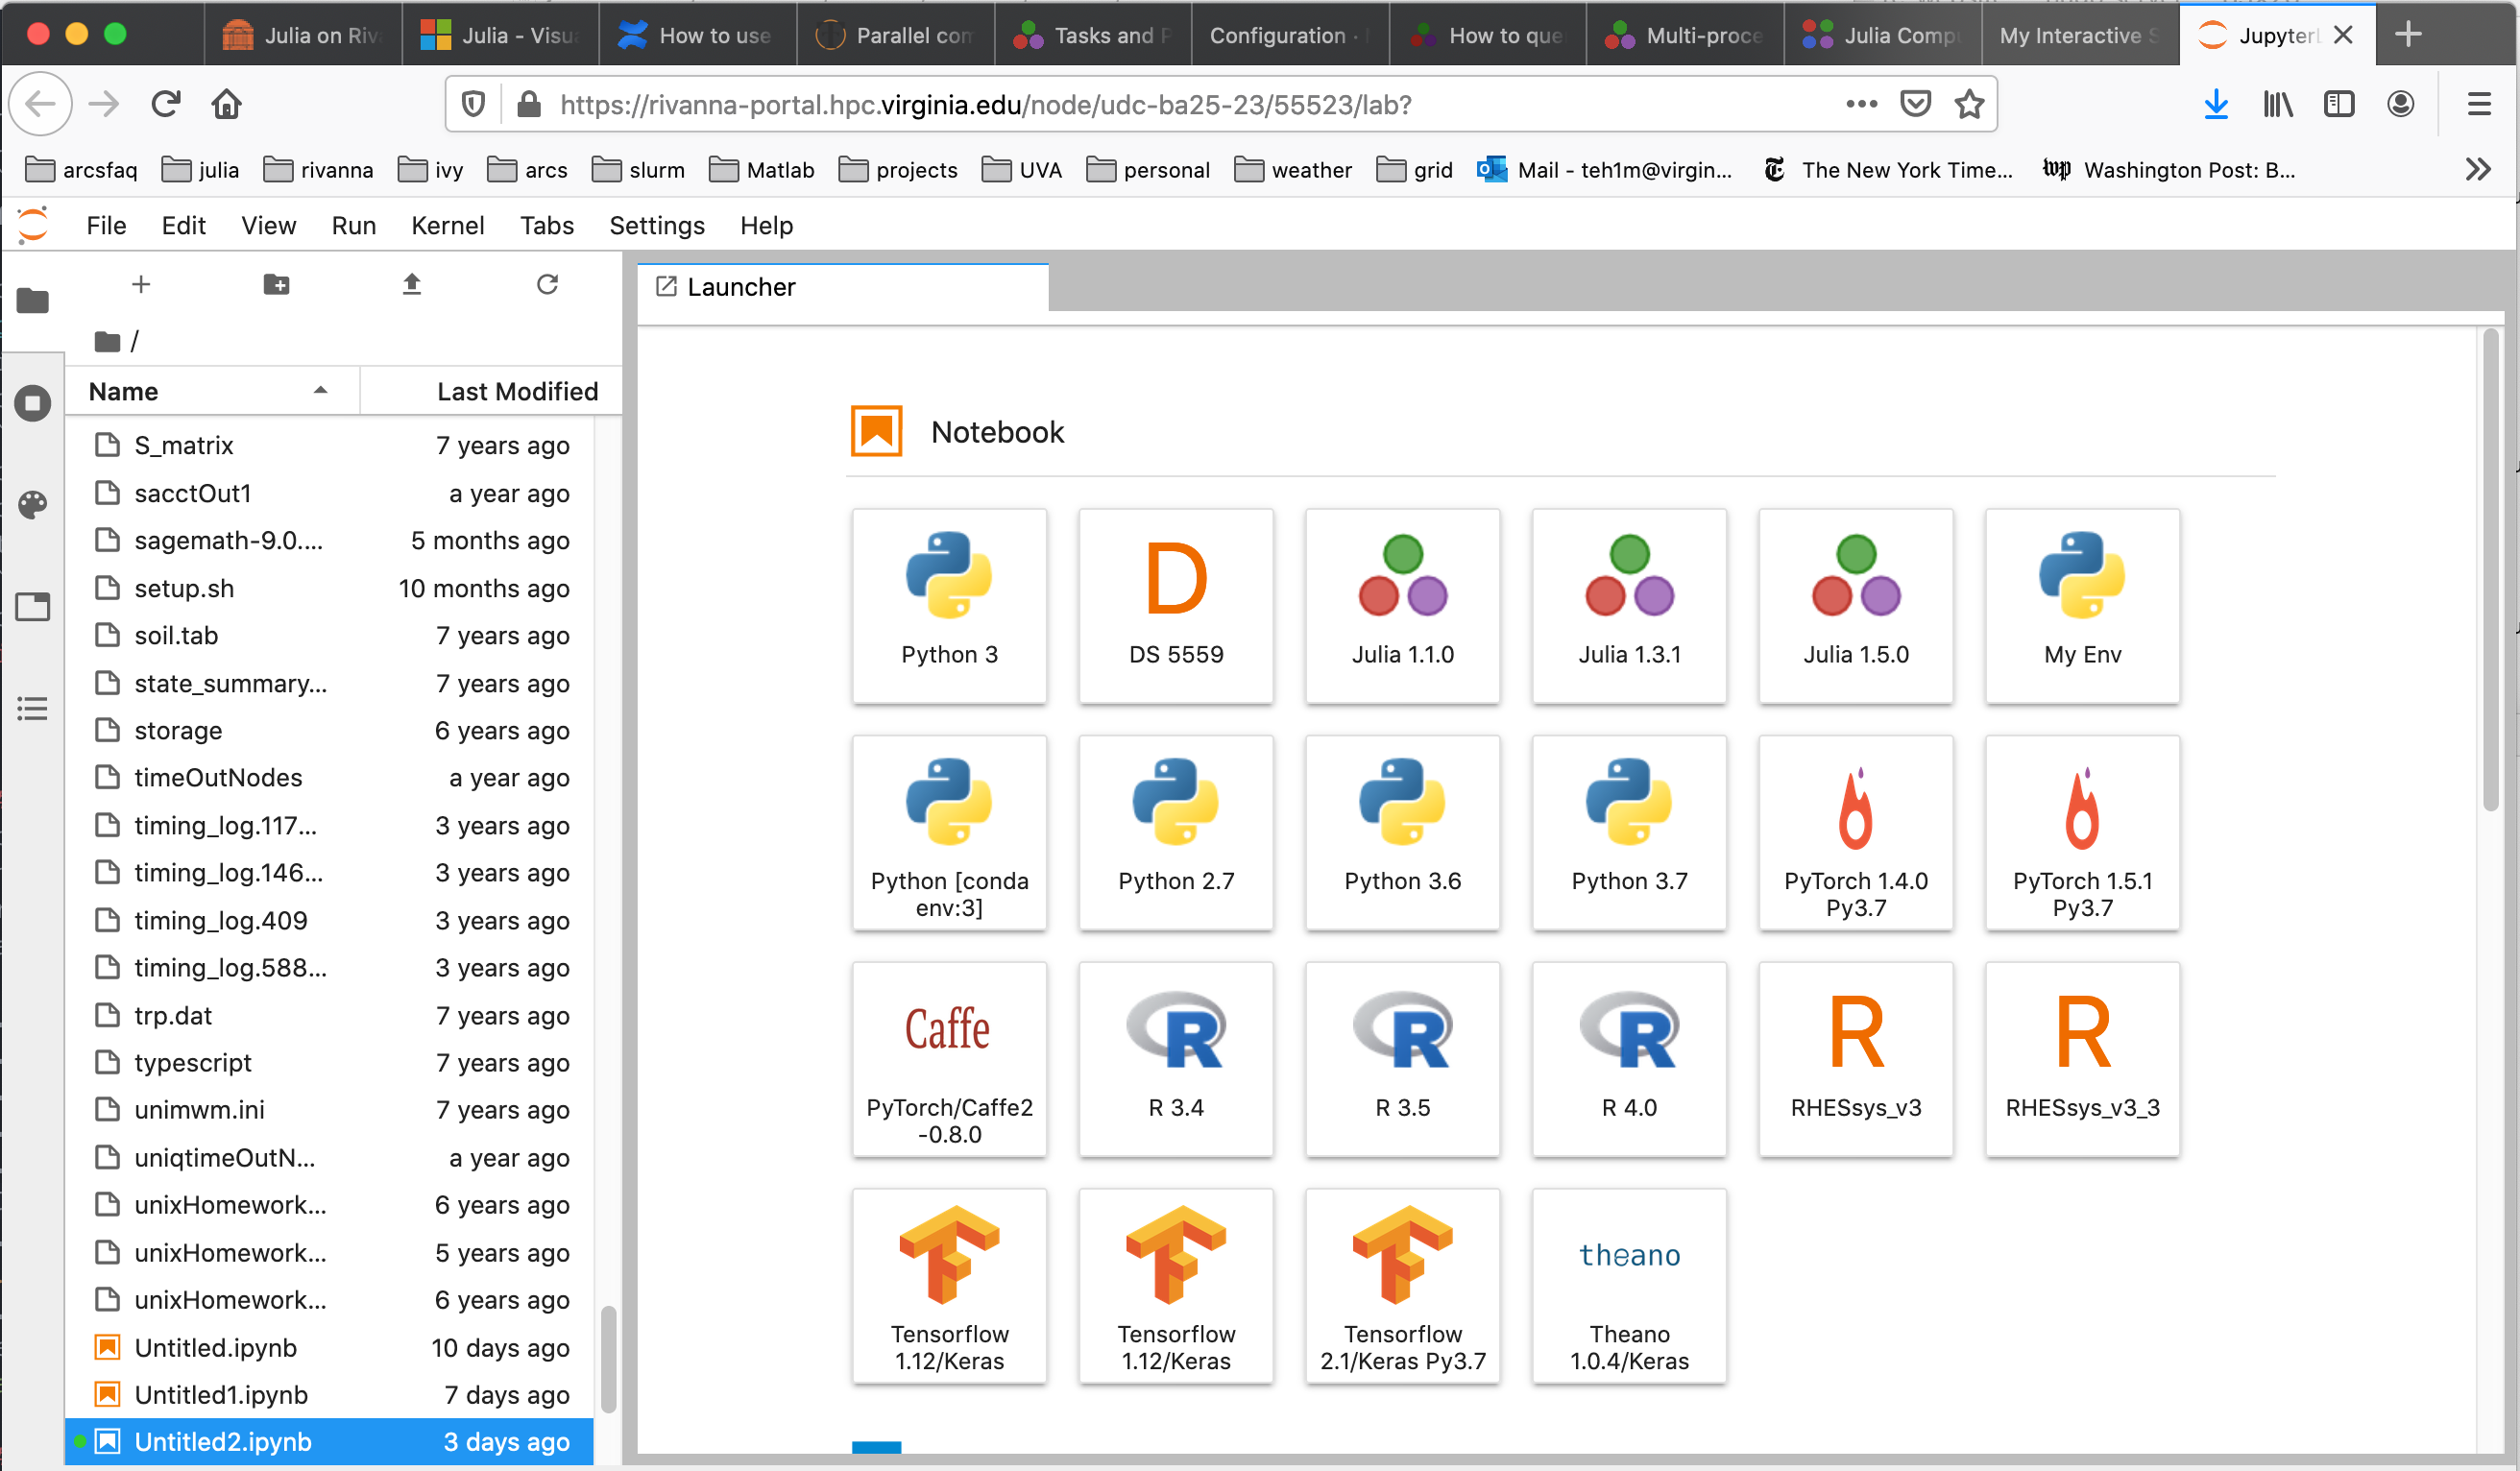
Select the kernel for the desired Julia version.
Closing the Interactive Session
When you are done, quit the JupyterLab application. The interactive session will be closed and the allocated resources will be released. If you leave the session open, your allocation will continue to be charged until the specified time limit is reached.
Running a Julia Batch Jobs on the HPC System
The UVA HPC system uses the Slurm resource manager to schedule and run jobs on the cluster compute nodes. The following are example Slurm scripts for submitting different types of Julia batch jobs to the cluster.
Submitting a batch job using a single core of a compute node.
Once your program is debugged, we recommend running in batch mode when possible. This runs the job in the background on a compute node. Write a Slurm script similar to the following:
#!/bin/bash
# This slurm script file runs
# a single-core Julia job (on one compute node)

#SBATCH -p standard
#SBATCH -A hpc_build
#SBATCH --time=00:10:00
#SBATCH --mail-type=end
#SBATCH --mail-user=teh1m@virginia.edu
#SBATCH --job-name=SingleTest
#SBATCH --output=SingleTest_%A.out
#SBATCH --error=SingleTest_%A.err
#SBATCH --ntasks=1

# Load  Julia environment
module load julia/1.5.0

julia hello.jl
The simple example code hello.jl is shown below.
msg="hello world"
println(msg)
Submitting a batch job using multiple cores on a compute node
The Distributed package can be used to run Julia code across multiple cores of a compute node. The Slurm script in this case would look like the following:
#!/bin/bash
# This slurm script file runs
# a single-core Julia job (on one compute node)

#SBATCH -p standard
#SBATCH -A hpc_build
#SBATCH --time=00:10:00
#SBATCH --mail-type=end
#SBATCH --mail-user=teh1m@virginia.edu
#SBATCH --job-name=SingleTest
#SBATCH --output=SingleTest_%A.out
#SBATCH --error=SingleTest_%A.err
#SBATCH --ntasks=1

# Load  Julia environment
module load julia/1.5.0

julia hello.jl
The Julia code in this case is,
using Distributed

# launch worker processes
num_cores = parse(Int, ENV["SLURM_CPUS_PER_TASK"])
addprocs(num_cores)

println("Number of cores: ", nprocs())
println("Number of workers: ", nworkers())

# each worker gets its id, process id and hostname
for i in workers()
    id, pid, host = fetch(@spawnat i (myid(), getpid(), gethostname()))
    println(id, " " , pid, " ", host)
end

# remove the workers
for i in workers()
    rmprocs(i)
end
and the output is,
Number of cores: 9
Number of workers: 8
2 11643 udc-ba26-19
3 11644 udc-ba26-19
4 11645 udc-ba26-19
5 11646 udc-ba26-19
6 11649 udc-ba26-19
7 11650 udc-ba26-19
8 11651 udc-ba26-19
9 11652 udc-ba26-19
Documentation on distributed computing with Julia can be accessed at the URL
Julia Jobs using Slurm Job Arrays
Slurm has a mechanism for launching multiple independent jobs with one
job script using the --array directive.
Array of Multiple Single-Core Julia Jobs
The following slurm script shows how to run 5 single core Julia jobs using
Slurm job arrays.
#!/bin/bash
# This slurm script file runs
# a single-core Julia job (on one compute node)

#SBATCH -p standard
#SBATCH -A hpc_build
#SBATCH --time=00:10:00
#SBATCH --mail-type=end
#SBATCH --mail-user=teh1m@virginia.edu
#SBATCH --job-name=SingleTest
#SBATCH --output=SingleTest_%A.out
#SBATCH --error=SingleTest_%A.err
#SBATCH --ntasks=1

# Load  Julia environment
module load julia/1.5.0

julia hello.jl
The jobArray.jl code can use the SLURM_ARRAY_TASK_ID shell variable assigned by
Slurm for indexing input file.
using Distributed
num_replication = Base.parse(Int, ENV["SLURM_ARRAY_TASK_ID"])
@everywhere println("Job array task id: ", num_replication, " on host $(gethostname())")
The Slurm script will produce 5 separate output files, each of the form
Job array task id: 4 on host udc-ba25-33c0
Parallel Julia on Multiple Compute Nodes
To run Julia parallel jobs that require more cores than are available on one compute node (e.g. > 40), please use the system MPI libraries. You cannot use the aforementioned Distributed package since it requires SSH permission into compute nodes.
#!/bin/bash
# This script uses Julia's MPI package that
# uses the Intel MPI library on Rivanna. See the URL
# https://juliaparallel.github.io/MPI.jl/stable/configuration/

#SBATCH -p parallel
#SBATCH -A hpc_build
#SBATCH --time=00:10:00
#SBATCH --mail-type=end
#SBATCH --mail-user=teh1m@virginia.edu
#SBATCH --job-name=parallelTest1
#SBATCH --output=parallelTest1_%A.out
#SBATCH --error=parallelTest1_%A.err
#SBATCH --nodes=8                #Number of nodes
#SBATCH --ntasks-per-node=1      #Number of cores per node

# Load Julia environment
module load julia
module load intel

srun julia helloParallel.jl
This involves importing the Julia MPI module:
import MPI

MPI.Init()
comm = MPI.COMM_WORLD
my_rank = MPI.Comm_rank(comm)
comm_size = MPI.Comm_size(comm)
println("Hello! I am ", my_rank, " of ", comm_size, " on ",gethostname())
MPI.Finalize()
To take advantage of the fast network interfaces between compute node, use the
system-provided MPI implementations. See the documentation on using a system-provided MPI.
The output of this program should look like,
Hello! I am 6 of 8 on udc-ba34-16c4
Hello! I am 1 of 8 on udc-ba34-10c9
Hello! I am 3 of 8 on udc-ba34-16c1
Hello! I am 5 of 8 on udc-ba34-16c3
Hello! I am 7 of 8 on udc-ba34-16c5
Hello! I am 2 of 8 on udc-ba34-16c0
Hello! I am 4 of 8 on udc-ba34-16c2
Hello! I am 0 of 8 on udc-ba34-10c8
Utilizing GPUs with Julia
General guidelines on requesting GPUs on UVA HPC
The following slurm script is for submitting a Julia job that uses 1 GPU. For each GPU requested, the script requests one cpu (ntasks-per-node). The article An Introduction to GPU Programming in Julia provides more details to get started.
#!/bin/bash
# This slurm script is an example of submitting a Julia
# code to a gpu

#SBATCH --partition=gpu
#SBATCH --gres=gpu:1
#SBATCH -A hpc_build
#SBATCH --time=1:00:00
#SBATCH --output=run_gpu_%A.out
#SBATCH --error=run_gpu_%A.err
#SBATCH --mail-type=end
#SBATCH --mail-user=teh1m@virginia.edu
#SBATCH --ntasks-per-node=1 # allocate one cpu for each gpu
##SBATCH --mem=60000

echo 'slurm allocates gpus ' $CUDA_VISIBLE_DEVICES

module purge
module load julia/1.5.0 cuda/10.2.89

julia gpuTest1.jl
The Julia code is
using Flux, CuArrays

z = CuArrays.cu([1, 2, 3])
println(2 * z)

m = Dense(10,5) |> gpu
x = rand(10) |> gpu
println(m(x))
and the output is
slurm allocates gpus  4
[2, 4, 6]
Float32[0.6239201, -0.36249122, -1.1242702, -0.9278027, 0.004131808]